21 March 2019 (Thursday)
14:30 - 17:05
LT4, 3/F, Cheng Yu Tung Building, The Chinese University of Hong Kong [Location / Campus Map]
-
Professor Juergen Handke, The University of Marburg, Germany
-
Professor Mathew Pryor, The University of Hong Kong
Teachers in higher education
Introduction
In the flipped classroom model, pre-class learning materials facilitate knowledge acquisition by students so they will be ready for the application of such knowledge in class. Multimedia content possesses certain advantages over traditional text-based reading materials in enabling a more engaging pre-class learning experience.
Hence, we introduce a six-step model to guide you through the production and application of instructional videos for use in the flipped classroom approach.
The Six-step Model
Step 1
Design Learning Experience
Step 2
Planning the Instructional Video
Step 3
Lay Out Your Production Plan
Step 4
Rolling the Camera
Step 5
Post-Production & Contingencies
Step 6
Delivery of Online Learning
Step 1
Design Learning Experience
Besides providing a standalone instructional video online, an integrated learning path can be built within a learning management system (LMS) with pre-class learning materials and assessment tasks. Pre- and post- quizzes are highly effective tools to gauge achievement of lower level cognitive learning outcomes, from individual students to the entire class. Teaching and learning support units within your institution can be the resource for specific assistance in the construction of integrated learning paths within a LMS.
One can see implementation of the flipped classroom approach as a spectrum - from partly-flipped to completely flipped. Flipping even just one class will provide practitioners with first-hand knowledge of the approach as well as the developing essential skills for converting subsequent classes. There is no need to flip classes all at once. Picking just one class to flip will be sufficient to experience the entire process and develop skills to plan additional flipped classes with increasingly deeper levels of adaptation.
Step 2
Planning Instructional Video
The investment of time and money will strongly influence the quality of any video which is ultimately produced. With advancements in digital video technology and the proliferation of video production equipment, the barriers to making a professional-quality online video are much lower than a decade ago. Sampling existing online videos for educational purposes such as the ones listed below can enhance one's perception of the expectation of learners nowadays.
Samples of online videos


In reviewing these sample videos, you will notice they share some common properties, such as:
-
Delivering key concepts within 10 minutes to maintain learners' attention;
-
Providing synchronized subtitles to enhance accessibility; and
-
Supporting specific cognitive learning outcomes.
Searching for relevant video content on YouTube or other online sources not only offers reference points for the commencement of your production plan, but also compiles a handy list of educational videos publically available.
Pre-production is an important part of the whole process and these tips will help you get started.
-
Write a video script for the video shoot to warrant the use of proper language;
-
Draw a storyboard to visualize the video to be produced;
-
Ensure the video supports the achievement of the intended learning outcomes;
-
Prepare graphics or images for elaborating the concepts in the learning materials and with proper instructional design;
-
Check and confirm the guidelines of using the university logos;
-
Search online for media content which is available free for non-commercial use when needed;
-
Seek permission accordingly, or pay for license to use, when presenting copyright protected materials from third parties inside the video;
-
Scout the site before outdoor shooting; take photos and record the possible scenarios for making contingency plans;
-
Decide shooting the video with the internal crew or outsourcing the entire video production by seeking recommendations from teaching and learning support units at your institution;
-
Make agreements with all parties involved in the production to transfer all copyrights of the artifacts to the project/institution.
Step 3
Lay Out Your Production Plan
eLearning Support at the Hong Kong Polytechnic University provides highly practical video production tips in their newsletters at https://www.polyu.edu.hk/elearning/elearning/mooc/video-production-tips.
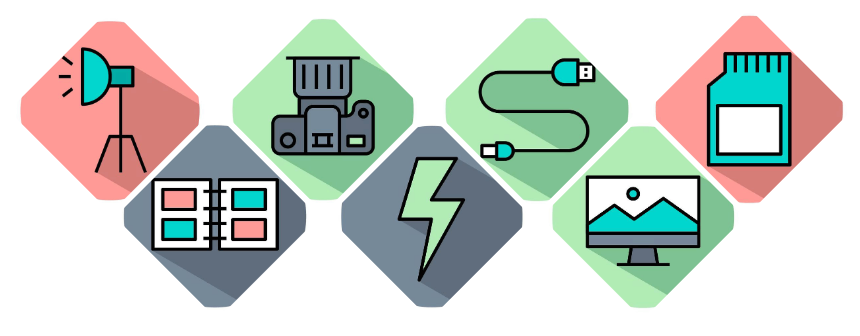
Step 4
Rolling the Camera
Shooting videos has become more prevalent with the advent of low-cost, high-quality equipment, but keep these pointers in mind.
-
Prepare a handheld signage to show "AUDIO & VIDEO RECORDING is in progress" for notifying people around the shooting area;
-
Use at least 2 LED lightings for indoor premises to set up Two-Point Lighting. However, it is good to have Three-Point Lighting if possible;
-
Use two digital cameras for the video shooting process, one for wide shot footage and one for close-up editing;
-
Bring enough battery units for the cameras and lightings. Also, ensure the performance of storage media cards for shooting devices are adequate in terms of writing speed and storage volume ;
-
Use a proper size tripod and a fluid tripod video head with sufficient safety payload weight specification;
-
Use video stabilizer equipment for handheld shooting;
-
Follow the storyboard or storytelling structure as a checklist for shooting footage;
-
Do a trial run of shooting with scripts for rehearsal purpose;
-
Monitor the audio level with headphones while shooting; avoid disturbance of unwanted sound, ambient noise, or clipped sound;
-
Play back the clip with the field monitor for reviewing when necessary;
-
Copy all the footage to two separate storage devices before editing.
You are now ready for the final step in production. To make it a success, keep these suggestions in mind.
-
Edit a "rough-cut" version for consolidating all footage for review;
-
Include visual elements inside the video to effectively promote learning;
-
Use proper and consistent transition effects;
-
Record voice over only when all the picture edit is "locked off" as 100% complete;
-
Apply tools for linguistics transcription, translation and text to speech for the creation of subtitles and voice-over;
-
Ensure synchronized subtitles are available to enhance comprehension and accessibility;
-
Use appropriate background music with appropriate audio levels for different scenes;
-
Avoid the use of Flash technology which will not be supported starting 2020;
Step 5
Post-Production and Contingencies
-
Make each video a self-contained learning resource and eliminate any unnecessary information;
-
Include logo of your institution and copyright statement to inform users the limitations in the use of the video;
-
Credit all third-party contents with titles and authors' names accordingly.
In case the schedule to release the video cannot be met, for example, other online video resources may serve as contingencies with the following arrangements:
-
Cite the source of the video accordingly;
-
Provide students with the hyperlink so they can view the video from the source;
-
Do not download the video and upload it to the course site in the LMS;
-
Reconfirm the availability at the period of use;
-
Use an alternative video when the selected one is no longer available.
There are indeed many things to pay attention to when producing instructional videos for students’ pre-class learning. If you have gone through all these steps and now have the productions at hand, check out this quick guide to make sure your videos are good for publishing.
Step 6
Delivery of Online Learning
Presenting, explaining, and promoting your innovation is critical to ensuring a positive reception by your students. Check out these tips for making it a success.
-
Explain the relevance to students in advance;
-
Limit the maximum length of each video to 10 minutes and separate videos with other learning activities to sustain students' attention;
-
Reconfirm all the facts and figures before the launch and inform students of any discrepancy;
-
Confirm the video supports the achievement of the intended learning outcomes;
-
Provide text alternatives for all graphs and figures to improve accessibility;
-
Offer an online Q&A channel for students who need assistance with the video contents;
-
Encourage students to further explore the subject by providing relevant information;
-
Set up the learning path in the LMS as designed in Step 1;and
-
Design follow-up learning activities for class time accordingly.